© 2018 CASIO COMPUTER CO., LTD.
Operation Guide 5554/5555 cAs10®
Contents
Before Getting Started ...
Indicators
Graphic Display Area
Navigating Between Modes
Cycling Between Timekeeping Mode Digital Display Contents
Shifting the Hands
Useful Features
Using Mobile Link with a Mobile Phone
Getting Ready
Auto Time Adjustment
Viewing Pedometer Data
Viewing Stopwatch Data
Configuring Stopwatch Target Time Settings
Configuring Programmable Timer Settings
Configuring World Time Settings
Adjusting Hand Alignment
Phone Finder
Configuring Watch Settings
Changing the Home City Summer Time Setting
Connection
- Connecting with a Phone
- Canceling a Connection with a Phone
- Using the Watch in a Medical Facility or Aircraft
- Unpairing
- If you purchase another phone
Pedometer
Counting Steps
Displaying the Step Count
Resetting Today's Step Count
Specifying a Daily Step Target
Causes of Incorrect Step Count
Stopwatch
Split Times and Lap Times
Measuring Elapsed Time
Measuring a Split Time
Measuring Lap Times
Using the Target Time Alarm
- Overview
- Specifying a Target Time
- Measuring Elapsed Time with the Target Time Function
- Clearing Target Times
- Viewing Data Records
- Deleting a Particular Record
- Deleting All Records
Timer
Setting the Timer Start Time
Using the Timer
Measuring Elapsed Time with Auto Start
Using the Interval Timer
- Overview
- Configuring Interval Timer Settings
- Using a Interval Timer for Elapsed Time Measurement
Dual Time
Configuring Dual Time Settings
Swapping the Home City Time and Dual Time
Alarms and Hourly Time Signal
Configuring Alarm Settings
Enabling/Disabling an Alarm or the Hourly Time Signal
Stopping an Alarm
Determining an Alarm's On/Off Status
Adjusting the Time Setting Manually
Setting the Time/Date
Switching Between 12-hour and 24-hour Timekeeping
Illumination Light
Illuminating the Face Manually
Auto Light
Configuring the Auto Light Setting
Specifying the Illumination Duration
Hand Alignment Adjustment
Adjusting Hand Alignment
Battery Replacement
Other Settings
Enabling the Button Operation Tone
Moving to Another Time Zone
Other Information
Supported Phones
Specifications
Mobile Link Precautions
Copyrights and Registered Copyrights
Before Getting Started...
This section provides an overview of your watch and explains how to connect with a phone. Connecting with a phone makes it possible to synchronize the watch's time setting with information acquired from the phone, and to view the step count of the watch and its stopwatch data on the phone screen.
Note
- The illustrations included in this operation guide have been created to facilitate explanation. An illustration may differ somewhat from the item it represents.
Indicators
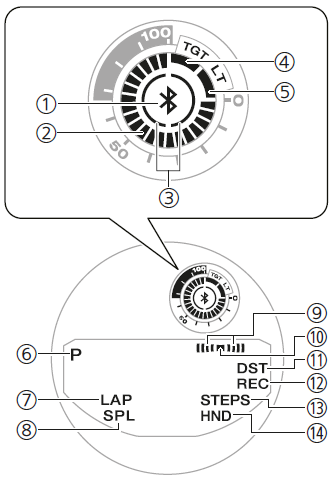

Displayed while there is connection between the watch and a phone.- Graphic area
Graphic display area operation is linked with operations in each watch mode. - Step indicators
Indicate whether or not the step count is being incremented. - [TGT]
In the Stopwatch Mode, indicates the measurement status while the Target Time function is enabled. - [LT]
Displayed while Auto Light is enabled. - [P]
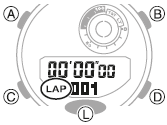
Appears when the displayed time is a p.m. time. - [LAP]
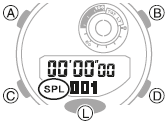
Displayed while a lap time is displayed. - [SPL]
Displayed while a split time is displayed. - Alarm
Displayed while an alarm is turned on. - Hourly time signal
Displayed while the hourly time signal is enabled. - [DST]
Displayed while the current time is a summer time (DST). - [REC]
Displayed while the watch is in the Recall Mode. - [STEPS]
Displayed while the step count is displayed. - [HND]
Displayed while the watch's hands are shifted for easier reading.
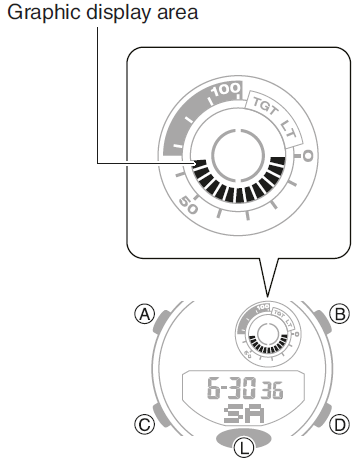
Graphic Display Area
Graphic display area operation is linked with operations in each watch mode.
- The graphic display area is blank in the Recall Mode and the Alarm Mode.
Timekeeping Mode
While a step count is displayed, the graphic display area shows your progress towards your daily step target. For other types of display, it changes with the count of the current time's seconds.
Stopwatch Mode
While the Target Time function is enabled, the graphic display area indicates to what extent you attained your target time. While the Target Time function is disabled, it changes with the count of the stopwatch elapsed time seconds.
Timer Mode
The graphic display area shows the percentage of the countdown that remains.
Dual Time
The graphic display area is synchronized with the Dual Time seconds.
Cycling Between Timekeeping Mode Digital Display Contents
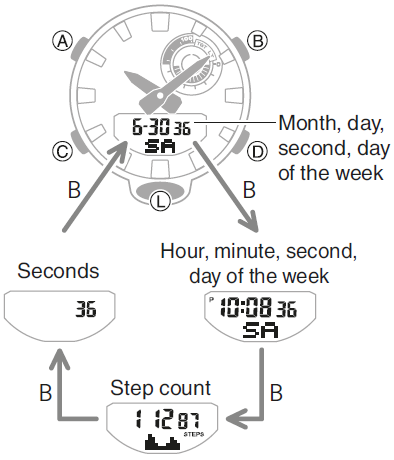
To cycle between digital display contents while in the Timekeeping Mode, press (B).
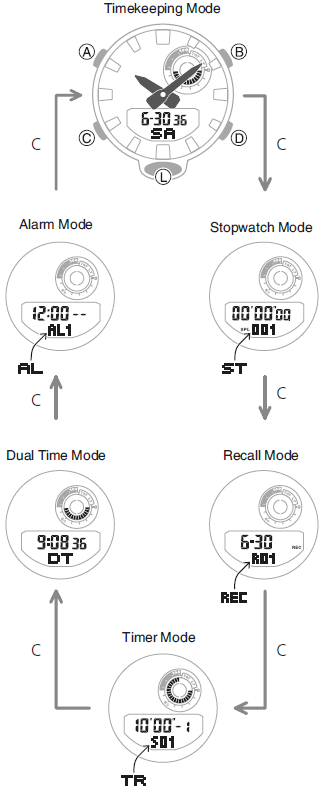
Navigating Between Modes
Press (C) to cycle between modes.
- In any mode, hold down (C) for about two seconds to enter the Timekeeping Mode.
- Connecting with a Phone
Hold down (D) for about two seconds to establish a connection with a phone.
To terminate a connection between a phone and the watch, press any watch button besides (L).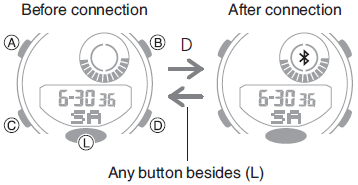
Shifting the Hands
Hand shift moves the hands out of the way for easy viewing of display information.
- While holding down (L), press (C).
This will shift the analog hands to allow easy viewing of display information.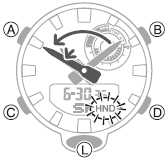
- To return the hands to their normal timekeeping positions, press (C).
Useful Features
Pairing the watch with your phone makes a number of the watch's features easier to use.
Auto time adjustment Auto Time Adjustment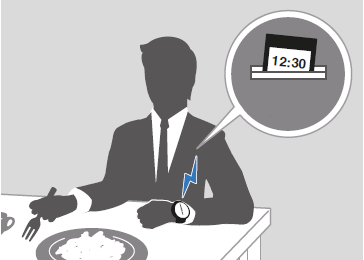
Selection of More Than 300 World Time cities Configuring World Time Settings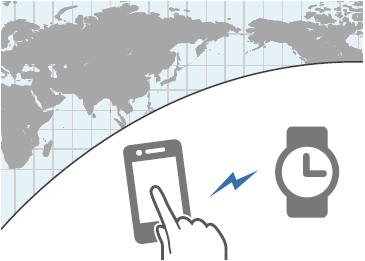
Data transfer to a phone Viewing Pedometer Data Viewing Stopwatch Data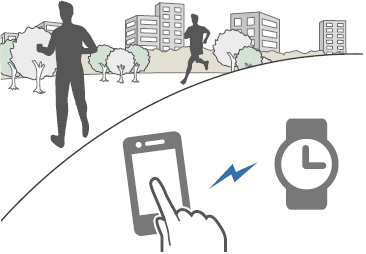
In addition, a number of other watch settings can be configured using your phone.
To transfer data to a watch and to configure settings, you first need to pair the watch with your phone. Getting Ready
Using Mobile Link with a Mobile Phone
While there is a Bluetooth connection between the watch and phone, the watch time setting is adjusted automatically. You can also change the watch's other settings.
Note
- This function is available only while GSHOCK Connected is running on the phone.
- This section describes watch and phone operations.
 : Watch operation
 : Phone operation
Getting Ready
To connect the watch with a phone, first install the CASIO "G-SHOCK Connected" app on the phone and then use Bluetooth to pair the watch with the phone.
- Install the app on your phone.
In Google Play or the App Store, search for the CASIO "G-SHOCK Connected" app and install it on your phone. - Configure Bluetooth settings.
Enable the phone's Bluetooth.
Note
• For details about setting procedures, see your phone documentation. - Pair the watch with a phone.
Before you can use the watch in combination with a phone, you first need to pair them.
1. Enter the Timekeeping Mode. Navigating Between Modes
2. Move the phone to be paired with close to (within one meter of) the watch.
3.Tap the "G-SHOCK Connected" icon.
4.Hold down (D) for about two seconds. Release the button when starts to flash.
5.Perform the operation shown on the screen of the phone to be paired with.
When a connection is established between the watch and phone, will stop flashing.
• If pairing fails for some reason, perform the procedure again from step 1.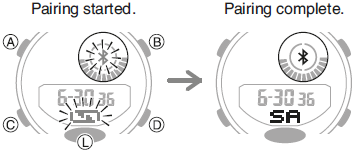
Note
- The first time you start up G-SHOCK Connected, a message will appear on your phone asking if you want to enable location information acquisition. Configure settings to allow background use of location information.
Auto Time Adjustment
You can configure watch settings to connect with a phone at preset times each day and adjust its time settings in accordance with information obtained from an online time server.
- Using Auto Adjust
Your watch adjusts its time setting four times a day according to a preset schedule. It performs the adjustment operation automatically as you go about your daily life, without any operation required by you.
Important!
The watch may not be able to perform auto time adjustment under the conditions described below.
-While the watch is too far away from its paired phone
-While communication is not possible due to radio interference, etc.
-While the phone is updating its system
-While G-SHOCK Connected is not running on the phone
Note
- If the watch does not indicate the correct time even if it is able to connect with a phone, adjust the hand and day indicator positions. Adjusting Hand Alignment
- If there is a World Time City specified with G-SHOCK Connected, its time will also be adjusted automatically.
- The watch will connect with the phone and perform auto time adjustment at around 12:30 a.m., 6:30 a.m., 12:30 p.m. and 6:30 p.m. The connection is automatically terminated after auto time adjustment is complete. - Triggering Immediate Time Adjustment
The watch will synchronize its time setting to that of the phone immediately when they are connected with each other. Whenever you want to adjust the watch's time setting based on your phone's time, perform the procedure below to connect with a phone.
1. Press (D).
This causes and [ADJ] to flash on the display. will stop flashing when a connection is established between the watch and phone, and the watch's time setting will be synchronized with that of the phone.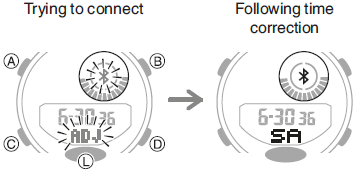
Note
- The connection is terminated automatically after time adjustment is complete.
- If time adjustment fails for some reason, the watch will return to the Timekeeping Mode without changing its time setting.
Viewing Pedometer Data
G-SHOCK Connected can be used to view the data below, which is measured by the watch.
- 24-hour step count, exercise intensity, and physical exertion
- Whether or not there is a stopwatch measurement or timer measurement (24 hours of data displayed by dividing it into 30-minute segments.)
- Weekly number of steps, calories burned
- Tap the "G-SHOCK Connected" icon.
- Hold down (D) for about two seconds.
When a connection is established between the watch and phone, will stop flashing.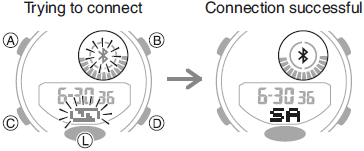
- Follow the instructions on the screen to display pedometer data.
Note
- You can also use G-SHOCK Connected to specify a daily step target.
- Though the step count is displayed on the watch in real time, G-SHOCK Connected displays step counts at the top of each hour and every half hour. Because of this the step counts displayed by G-SHOCK Connected may be different from those displayed by the watch.
Viewing Stopwatch Data
This section explains how to send lap times and split times (up to 200 records) stored in watch memory, and other data to your phone for viewing with G-SHOCK Connected.
- Sending Stopwatch Data to a Phone
Use the procedure below to send data from the watch to a phone.
1. Tap the "G-SHOCK Connected" icon.
2. Hold down (D) for about two seconds.
When a connection is established between the watch and phone, will stop flashing.
3. Perform the operation shown on the phone screen to transfer data measured by the watch to the phone.
After data transfer is complete, a list of the measurement data will appear on the phone display.
- Tapping a stopwatch data item displays its details. - Checking Sent Data
Use G-SHOCK Connected to check the data you sent to the phone.
1. Tap the "G-SHOCK Connected" icon.
2. Perform the operation shown on the phone screen to view the measurement data you want.
Note
You can delete data by tapping "Edit".
Configuring Stopwatch Target Time Settings
You can use G-SHOCK Connected to configure settings for up to 10 target times. Target times can be set in one-second units, for a total of up to 24 hours.
• For information about target times, refer to the information below. Overview
- Tap the "G-SHOCK Connected" icon.
- Hold down (D) for about two seconds.
When a connection is established between the watch and phone, will stop flashing. - Perform the operation shown on the phone screen to configure stopwatch target time settings.
Configuring Programmable Timer Settings
You can use G-SHOCK Connected to configure programmable timer settings and create a group of multiple timers.
• For information about the programmable timer, refer to the information below. Overview
- Tap the "G-SHOCK Connected" icon.
- Hold down (D) for about two seconds.
When a connection is established between the watch and phone, will stop flashing. - Perform the operation shown on the screen to configure the programmable timer settings.
Note
To change a timer title or delete a timer, tap "Edit".
Configuring World Time Settings
Specifying a World Time City with G-SHOCK Connected causes the watch's World Time City to change accordingly. The standard time/summer time setting of the World Time will be adjusted automatically without any watch operation required by you.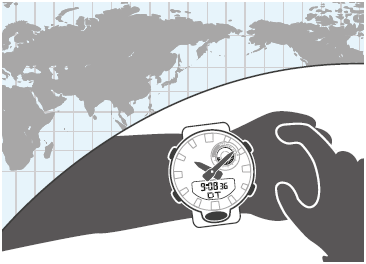
Note
G-SHOCK Connected World Time lets you select from among approximately 300 cities as the World Time City.
- Selecting a World Time City
1. Tap the "G-SHOCK Connected" icon.
2. Hold down (D) for about two seconds.
When a connection is established between the watch and phone, will stop flashing.
3. Perform the operation shown on the phone screen. The World Time setting will be reflected on the watch.
• You can check the World Time by entering the Dual Time Mode. - Configuring the Summer Time Setting
1. Tap the "G-SHOCK Connected" icon.
2. Hold down (D) for about two seconds.
When a connection is established between the watch and phone, will stop flashing.
3. Perform the operation shown on the phone screen to select a summer time setting.
• "Auto"
The watch switches between standard time and summer time automatically.
• "OFP'
The watch always indicates standard time.
• "ON"
The watch always indicates summer time.
Note
• While the summer time setting is "Auto", the watch will switch between standard time and summer time automatically. You do not need to switch between standard time and summer time manually. Even if you are in an area that does not observe summer time, you can leave the watch's summer time setting as "Auto".
• Changing the time setting manually with a watch operation will cancel auto standard time/summer time switching.
• A G-SHOCK Connected screen shows information about summer time periods. - Swapping Your World Time and Home Time
1. Tap the "G-SHOCK Connected" icon.
2. Hold down (D) for about two seconds.
When a connection is established between the watch and phone, will stop flashing.
3. Perform the operation shown on the phone screen to swap your Home Time with your Wor1d Time.
For example, if your Home City is Tokyo and the Wor1d Time City is New York, they will be swapped as shown below.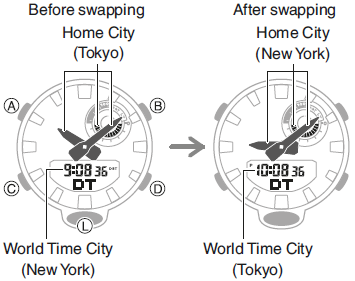
Note
Auto time adjustment does not work for 24 hours after swapping of the Home Time and Wor1d Time.
Adjusting Hand Alignment
If the hands are out of alignment even though auto time adjustment is being performed, use G-SHOCK Connected to adjust them.
- Tap the "G-SHOCK Connected" icon.
- G Hold down (D) for about two seconds.
When a connection is established between the watch and phone, will stop flashing. - Perform the operation shown on the phone screen to correct hand alignment.
Phone Finder
You can use phone finder to trigger a tone on the phone to make it easy to find. The tone is forced to sound even if the phone is in vibrate mode.
Important!
• Do not use this function in areas where phone call tones are restricted.
• The tone sounds at a high volume. Do not use this function when listening to phone output over earphones.
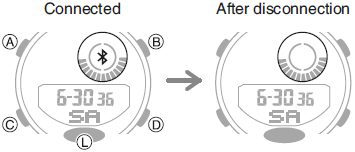
- If the watch is connected with a phone, press any button besides (L) to terminate the connection.
- Hold down (C) for about 2 seconds.
This will cause the watch to enter the Timekeeping Mode. - G Hold down (D) for about five seconds until [Find] appears on the display.
A connection will be established between the watch and phone, and then the phone's ringtone will sound.
• It will take a few seconds before the phone tone sounds.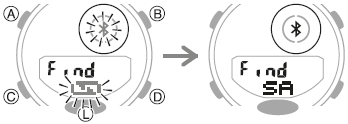
- Press any button besides (L) to stop the tone.
• You can press any watch button to stop the phone tone, but only during the first 30 seconds after it starts to sound.
Configuring Watch Settings
You can use G-SHOCK Connected to specify the amount of time until the Bluetooth connection is automatically terminated and the illumination duration, and to configure other settings.
- Tap the "G-SHOCK Connected" icon.
- Hold down (D) for about two seconds.
When a connection is established between the watch and phone, will stop flashing. - Select the setting you want to change and then perform the operation shown on the phone screen.
Changing the Home City Summer Time Setting
- Tap the "G-SHOCK Connected" icon.
- G Hold down (D) for about two seconds.
When a connection is established between the watch and phone, will stop flashing. - Perform the operation shown on the phone screen to change your Home City summer time setting.
Connection
Connecting with a Phone
This section explains how to establish a Bluetooth connection with a phone that is paired with the watch.
• If the watch is not paired with the phone you wantto connect with, refer to the information below and pair them.
- Enter the Timekeeping Mode. Navigating Between Modes
- Move the phone close to (within one meter of) the watch.
- G After confirming that is not displayed, hold down (D) for about two seconds.
When a connection is established between the watch and phone, will stop flashing.
Important!
If you have problems establishing a connection, it could mean that GSHOCK Connected is not running on the phone. On the phone's home screen, tap the "G-SHOCK Connected" icon. After the app starts up, hold down the watch's (D) button for about two seconds.
Note
The connection will be terminated if you do not perform any operation on the watch or phone for a fixed amount of time. To specify the connection limit time, perform the following operation with GS HOCK Connected: "Watch settings"âž”"Connection time". Next, select a setting of 3 minutes, 5 minutes, or 10 minutes.
Canceling a Connection with a Phone
To terminate a Bluetooth connection, press any watch button besides (L).
Using the Watch in a Medical Facility or Aircraft
Whenever you are in a hospital, on an aircraft, or in any other location where connection with a phone may cause problems, you can perform the procedure below to disable auto time adjustment. To re-enable auto time adjustment, perform the same operation again.
- Tap the "G-SHOCK Connected" icon.
- Hold down (D) for about two seconds.
When a connection is established between the watch and phone, will stop flashing. - Perform the operation shown on the phone screen to enable or disable auto time adjustment.
Unpairing
- If the watch is connected with a phone, press any button besides (L) to terminate the connection.
- Tap the "G-SHOCK Connected" icon.
- Perform the operation shown on the phone screen to unpair.
If you purchase another phone
You need to perform the pairing operation whenever you want to establish a Bluetooth connection with a phone for the first time. Pair the watch with a phone.
Pedometer
You can use the pedometer to keep track of your step count while walking, engaging in your normal daily activities, etc.

Counting Steps
If you are wearing the watch correctly, the pedometer will count your steps as you walk or engage in your normal daily activities.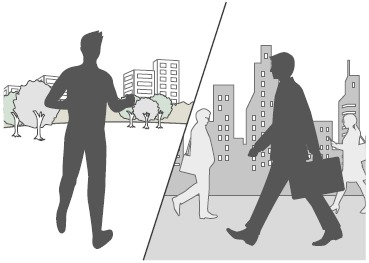
Important!
Since this watch's pedometer is a wrist-worn device, it may detect nonstep movements and count them as steps. Also, abnormal arm movements while walking may cause a miss count of steps.
- Getting Ready
To enable the most accurate step count, wear the watch with the face on the outside of your wrist and tighten the band securely. A loose band may make it impossible to obtain correct measurement.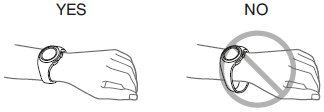
- Counting Steps
The pedometer will start counting your steps when you start walking. The step indicators show whether or not the step count is being incremented.
Alternating at one-second intervals: Walking (step count being incremented)
Both displayed: Not walking (step count not being incremented)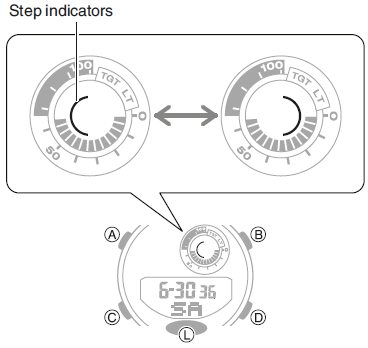
- To check the step count Displaying the Step Count
Displaying the Step Count
- Enter the Timekeeping Mode. Navigating Between Modes
- Use (B) to display the step count.
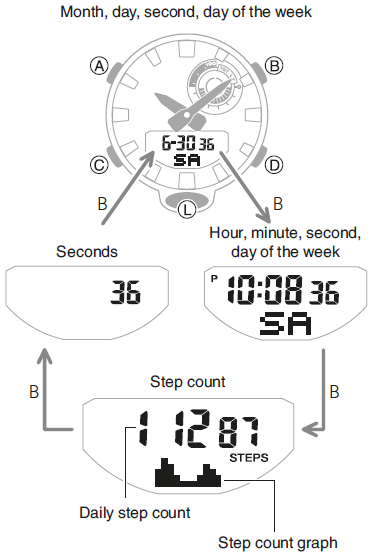
- Interpreting the Step Count Graph
The Step Count Graph shows the number of steps (up to 1,000) you have taken each hour. This lets you easily check your walking pace over the past 1 0 or 11 hours.
• The Step Count Graph is not displayed while the step count is zero.
• Graph contents are normally updated at the top of each hour.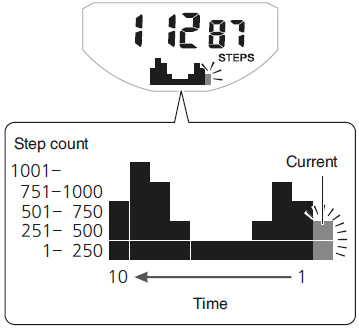
- Checking Your Progress to Your Daily Step Target
The graphic display area shows your current progress toward achieving the daily step target specified by you.
Example: Daily target of 10,000 steps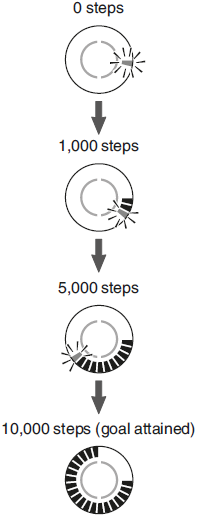
Note
• The step count can show a value up to 999,999 steps. If the step count exceeds 999,999, the maximum value (999,999) remains on the display.
• To prevent miscounts, the displayed count does not increase for about 10 seconds after you start walking. After you have been walking for about 10 seconds, the correct count appears, including the steps you took during the previous 10 seconds.
• Graph contents are normally updated at the top of each hour.
• The step count is reset to zero at midnight each day.
• To save power, step counting stops automatically if you take off the watch (no detectable watch movement) and you do not perform any operation for two or three minutes.
• The Step Count Graph is updated even when any one of the events below occurs.
- When accelerometer operation is stopped to save power
- When counting is not possible due to accelerometer error or insufficient power
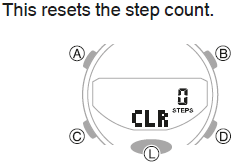
Resetting Today's Step Count
- Enter the Timekeeping Mode. Navigating Between Modes
- Hold down (B) and (D) for about two seconds.
Specifying a Daily Step Target
You can specify a daily step goal within the range of 1,000 to 50,000, in units of 1,000 steps.
- Enter the Timekeeping Mode. Navigating Between Modes
- Hold down (A) for about two seconds.
Release the button when [SET] stops flashing.
• This causes the current daily step target to flash.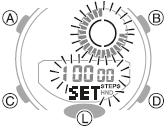
- Use (D) and (B) to change the daily step target setting.
- Press (A) to exit the setting screen.
Causes of Incorrect Step Count
Any of the conditions below may make proper counting impossible.
- Walking while wearing slippers, sandals, or other footwear that encourages a shuffling gait
- Walking on tile, carpeting, snow, or other surface that causes a shuffling gait
- Irregular walking (in a crowded location, in a line where walking stops and starts at short intervals, etc.)
- Extremely slow walking or extremely fast running
- Pushing a shopping cart or baby stroller
- In a location where there is a lot of vibration, or riding on a bicycle or in a vehicle
- Frequent movement of the hand or arm (clapping, fanning movement, etc.)
- Walking while holding hands, walking with a cane or stick, or engaging in any other movement in which your hand and leg movements are not coordinated with each other
- Normal daily non-walking activities (cleaning, etc.)
- Wearing the watch on your dominant hand
- Walking for 1 o seconds or less
- Watch hand movement (by the hand shift function, etc.)
Stopwatch
The stopwatch measures elapsed time in 1/100-second units for the first hour, and in 1·second units after that for up to 24 hours.
In addition to normal elapsed time measurements, the stopwatch also lets you take split time and lap time readings. You can also set a target time and monitor your progress in attaining it. You can configure settings so the watch alerts you with a beeper and/or display indicator when you attain your target.
Note
- Up to 200 split time and lap time records can be stored in watch memory. Perform a lap or split time operation while there are already 200 records in memory will cause the oldest record to be deleted automatically to make room for the new one.
- You can use the Recall Mode to view the latest measurement data. Viewing Data Records
- You can use G-SHOCK Connected to view past measurement data.
Getting Ready
Enter the Stopwatch Mode. Navigating Between Modes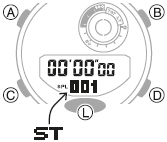
Split Times and Lap Times
- Split time
A split time is the time elapsed from the start, up to any point along the course of an event.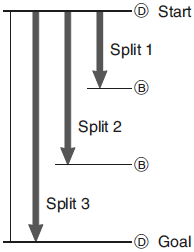
- Lap time
A lap time shows the time elapsed during a specific lap around a track, etc.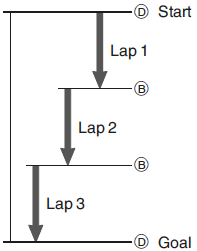
Measuring Elapsed Time
- Use the operations below to measure elapsed time.
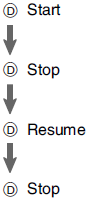
• Elapsed time is shown in 1/100-second units for the first hour of the measurement. After the first hour, elapsed time is shown in one-second units.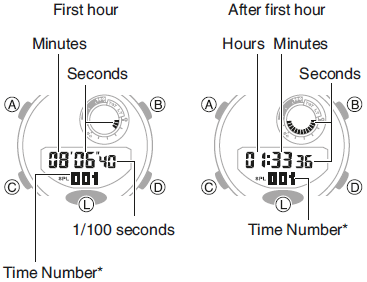
• [Fl is displayed for the final time number when an elapsed time measurement operation is stopped. - Press (B) to reset the elapsed time to all zeros.
Measuring a Split Time
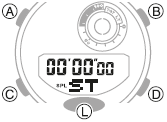
- Press (A) to display [SPL].
- Use the operations below to measure elapsed time.
• Each press of (B) causes the elapsed time up to that point (split time) to be indicated for eight seconds.
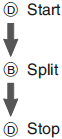
• Elapsed time is shown in 1/100-second units for the first hour of the measurement. After the first hour, elapsed time is shown in one-second units.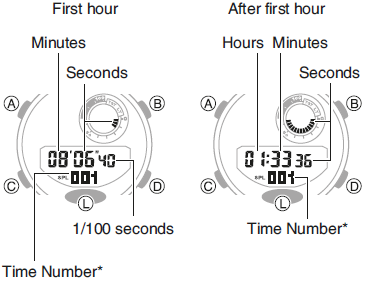
• [F] is displayed for the final time number when the elapsed time measurement operation is stopped. - Press (B) to reset the elapsed time to all zeros.
Measuring Lap Times
- Press (A) to display [LAP].
- Use the operations below to measure elapsed time.
• Each press of (B) causes the elapsed time of the section (lap time) to be shown for eight seconds.
• Elapsed time is shown in 1/100-second units for the first hour of the measurement. After the first hour, elapsed time is shown in one-second units.
• [Fl is displayed for the final time number when the elapsed time measurement operation is stopped. - Press (B) to reset the elapsed time to all zeros.
Using the Target Time Alarm
Overview
After you configure one or more target times, the watch will beep and display an alert to let you know when the elapsed time reaches a target time.
If you want to try running five kilometers in 30 minutes, for example, you could set the target times shown below and monitor your pace for each kilometer.
Target Time 1: 6 minutes
TargetTime 2: 12 minutes
TargetTime 3: 18 minutes
Target Time 4: 24 minutes
Target Time 5: 30 minutes
Specifying a Target Time
You can specify up to 10 target times, each of which can be up to 24 hours, in one-second units.
- If you want to specify multiple target times, specify the smallest time as Target Time 1, and the successive times in ascending order (Target Time 2, Target Time 3, etc.)
- Hold down (A) for about two seconds.
• You can toggle the Target Time function between enabled and disabled by pressing (D).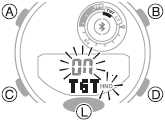
- Press (C).
- Use (B) and (D) to select a target time number.
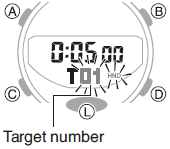
- Press (C).
- Use (B) and (D) to change the target time hour setting.
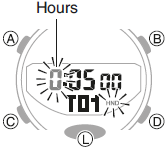
- Press (C).
- Use (B) and (D) to change the target time minute setting.
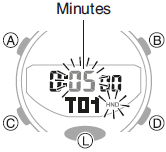
- Press (C).
- Use (B) and (D) to change the target time second setting.
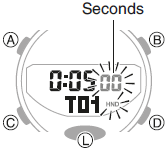
• If you want to specify multiple target times, repeat steps 2 through 9 above. - Press (A) to exit the setting screen.
Measuring Elapsed Time with the Target Time Function
You can perform the same elapsed time operations as those described in the sections below. Measuring Elapsed Time Measuring a Split Time Measuring Lap Times
Starting an elapsed time operation will cause [TGT] to flash on the display.
An alarm will sound for 1 O seconds to let you know when the elapsed time operation reaches a target time you set.
[TGT] disappears from the display when the elapsed time operation exceeds the last target time.
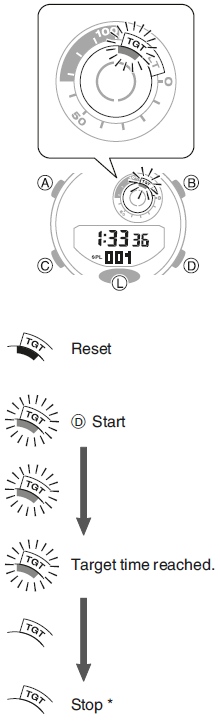
- [TGT] is displayed if you stop the elapsed time measurement operation before the target time was reached.
Clearing Target Times
The procedure below restores target time settings to their initial factory defaults.
- Target Time 1: 5 minutes
- Target Time Function: Off
- Hold down (A) for about two seconds.
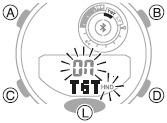
- Hold down (B) and (D) at the same time for about five seconds until [ALL] stops flashing on the display.
This restores target time settings to their initial factory defaults.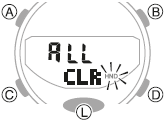
- Press (A) to complete the operation.
Viewing Measured Time Data
Viewing Data Records
You can use the operation below to view split times and lap times.
- Enter the Recall Mode. Navigating Between Modes
• This causes the record number of the latest measurement to appear.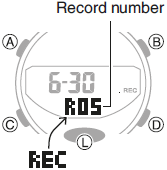
- Hold down (A) for about two seconds to cycle through record numbers.
• Each time you hold down (A), the next older record number appears.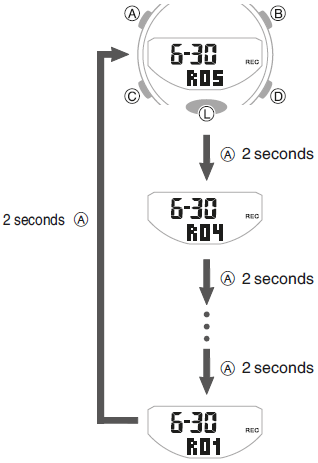
- Use (D) and (B) to display the measurement value you want.
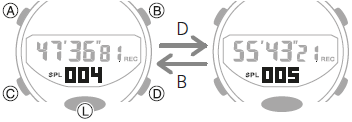
• Press (A) to toggle the measurement value display between lap time and split time.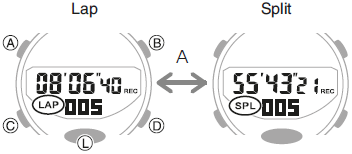
Note
• A record of the measured data is created and assigned a number for each measurement operation (from start to stop).
Deleting a Particular Record
Use the procedure below to delete a selected data record.
- Enter the Recall Mode. Navigating Between Modes
- Hold down (A) for about two seconds.
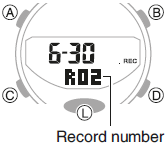
• Holding down (A) switches the record number. - Hold down (B) and (D) for about two seconds.
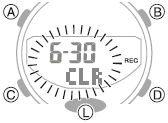
Release the button as soon as [CLR] appears. This deletes the displayed data.
Note
• You cannot delete data while an elapsed time measurement operation is in progress.
Deleting All Records
You can use the procedure below to clear all data records in watch memory.
- Enter the Recall Mode. Navigating Between Modes
- Hold down (B) and (D) for about five seconds.
[CLR] flashes and then stops flashing to indicate that the displayed data record was deleted. Keep the buttons depressed until [ALL CLR] flashes for about 1.5 seconds and then stops flashing, which indicates all data was deleted.
Note
• You cannot delete data while an elapsed time measurement operation is in progress.
Timer
The timer counts down from a start time specified by you. The watch beeps every second for the last five seconds of the countdown.
• The beeper is muted in the cases described below.
-When battery power is low.
Getting Ready
Enter the Timer Mode. Navigating Between Modes
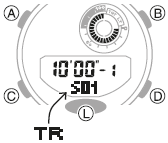
Setting the Timer Start Time
The start time can be set in 1-second units up to 60 minutes.
- Hold down (A) for about two seconds.
- Use (D) and (B) to specify the number of timer repeats.
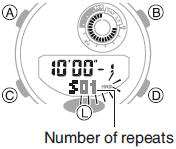
- Press (C).
- Use (D) and (B) to display [1].
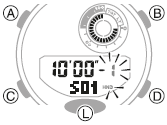
- Press (C).
This causes the minutes digits to flash. - Use (D) and (B) to change the timer minutes setting.
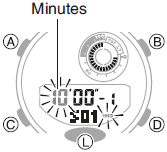
- Press (C).
This causes the seconds digits to flash. - Use (D) and (B) to change the start time seconds setting.
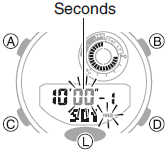
- Press (A) to exit the setting screen.
Using the Timer
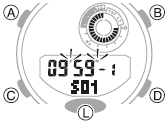
A typical operation is shown below.
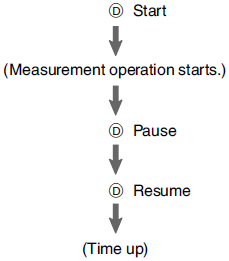
- The watch beeps every second for the last five seconds of the countdown.
- To stop a countdown operation, first pause it and then press (B). This will reset the timer to its start time.
Measuring Elapsed Time with Auto Start
You can use the procedure below so a timer countdown starts automatically following a five-second pre-count.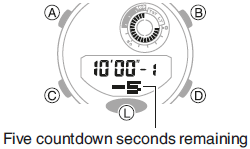
A typical operation is shown below. 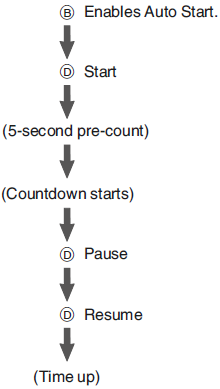
To stop a countdown operation, first pause it and then press (B). This will reset the timer to its start time.
Using the Interval Timer
Overview
You can configure settings for multiple timers so they perfonn different count downs one after the other to create an interval timer. You can use an interval timer to control how much time you spend doing push-ups, squats, or other exercises that make up a fitness workout.
For example, you could configure an interval timer as shown below and have intervals 1 through 4 repeat 10 times
Timer Settings
• Interval 1: 30 seconds
• Interval 2: 20 seconds
• Interval 3: 30 seconds
• Interval 4: 25 seconds
• Sets: 10
Interval Training Workout
- Push-ups: 30 seconds
- Rest: 20 seconds
- Squats: 30 seconds
- Rest: 25 seconds
Note
• You can configure up to five different timers to repeat up to 20 times.
Configuring Interval Timer Settings
- Hold down (A) for about two seconds.
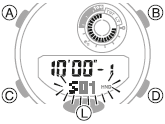
- Use (D) and (B) to specify the number of timer repeats.
- Press (C).
- Use (D) and (B) to specify the position of the timer in the sequence.
• To specify the first position, set [1].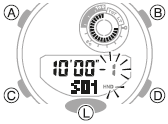
- Press (C).
This causes the minutes digits of Timer 1 to flash. - Use (D) and (B) to change the timer minutes setting.
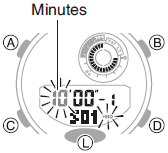
- Press (C).
This causes the seconds digits of Timer 1 to flash. - Use (D) and (B) to change the start time seconds setting.
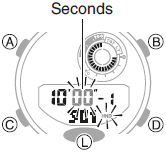
- Press (C) twice.
This returns to the screen in step 4. - Repeat steps 4 through 9 as many times as necessary to configure the settings of the other timers.
- Press (A) to exit the setting screen.
Using a Interval Timer for Elapsed Time Measurement
- Press (D) to start the countdown.
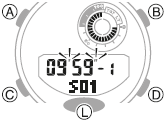
The watch beeps every second for the last five seconds of the current countdown, and starts the countdown of the next timer when the end is reached.
• To pause an ongoing timer countdown, press (D). To reset a paused countdown to its start time, press (B).
• When there is a multiple timer countdown operation in progress, you can immediately terminate the current countdown and start the next countdown by pressing (A).
Dual Time
Dual Time lets you look up the current time in various time zones around the globe.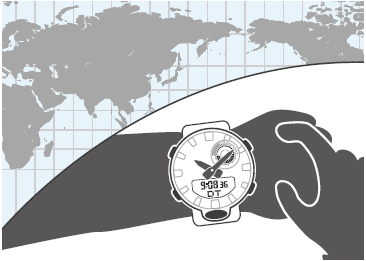
Getting Ready
Enter the Dual Time Mode. Navigating Between Modes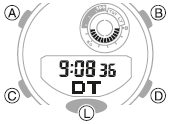
Configuring Dual Time Settings
Dual Time lets you set the current time in another time zone in addition your current location time.
- Hold down (A) for about two seconds.
This causes the hours digits to flash.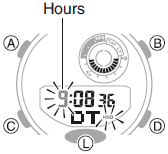
- Use (D) and (B) to change the hour setting.
- Press(C).
This causes the minutes digits to flash.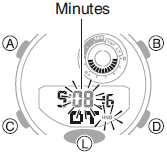
- Use (D) and (B) to change the minute setting.
• You can change the setting in 15-minute increments. - Press (A) to exit the setting screen.
Swapping the Home City Time and Dual Time
- Enter the Dual Time Mode. Navigating Between Modes
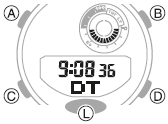
- Hold down (B) for about two seconds.
This swaps the Home City time and Dual Time.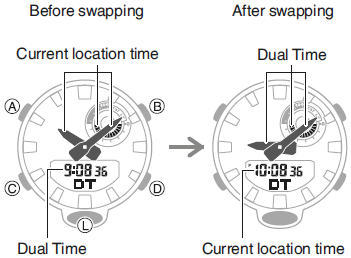
Note
• This function comes in handy when you need to move to another time zone. For details about how to use it, go to the section below. Moving to Another Time Zone
Alarms and Hourly Time Signal
The watch will beep when an alarm time is reached. You can set up to five different alanns. The hourly time signal causes the watch to beep every hour on the hour.
Getting Ready
Enter the Alarm Mode. Navigating Between Modes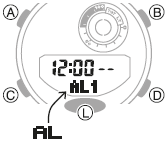
Configuring Alarm Settings
- Press (D) to scroll through alarm numbers ([AL1] to [AL5]) until the number of the alarm you want to configure is displayed.
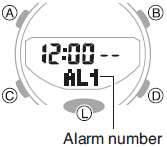
- Hold down (A) for about two seconds.
This causes the hours digits to flash.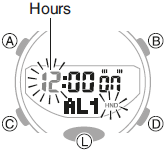
- Use (D) and (B) to change the hour setting.
• If you are using 12-hour timekeeping, [P] indicates p.m.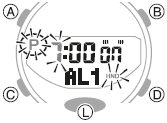
- Press (C).
This causes the minutes digits to flash.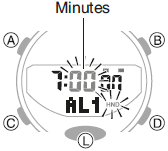
- Use (D) and (B) to change the minute setting.
- Press (A) to exit the setting screen.
Note
• A beeper will sound for 10 seconds to let you know when the alarm time is reached.
Enabling/Disabling an Alarm or the Hourly Time Signal
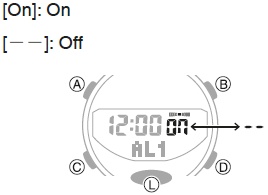
- Press (D) to scroll through alarm numbers ([AL1] to [AL5]) and the hourly time signal ([SIG]) screens until the one you want to configure is displayed.
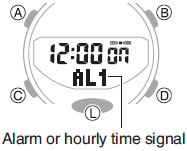
- Press (B) to toggle the displayed alarm or the hour1y time signal between on and off.
Stopping an Alarm
Pressing any button while the beeper is sounding stops it.
Determining an Alarm's On/Off Status
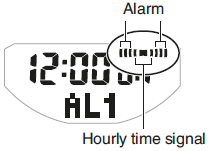
Turning on an alann or the hourly time signal causes the corresponding indicator to appear on the display. The alarm on indicator is displayed when one or more alarm is turned on.
Adjusting the Time Setting Manually
When there is no communication with a phone, the time and date can be adjusted with the procedure below.
Getting Ready
Enter the Timekeeping Mode. Navigating Between Modes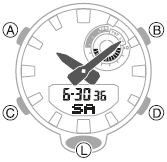
Setting the Time/Date
- Hold down (A) for about two seconds.
Release the button when [SET] stops flashing.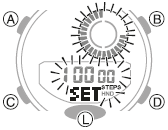
- Keep pressing (C) until the setting you want to change is flashing.
• Each press of (C) moves the flashing to the next setting in the sequence shown below.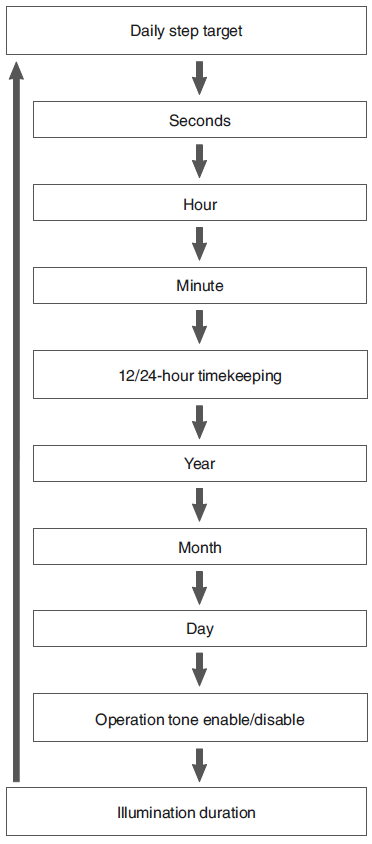
- Configure the date and time settings.
• To reset the seconds to 00: Press (D). 1 is added to the minutes when the current count is between 30 and 59 seconds.
• To change other settings: Use the (D) and (B) buttons. - Repeat steps 2 through 3 to configure date and time settings.
- Press (A) to exit the setting screen.
Switching Between 12-hour and 24-hour Timekeeping
- Hold down (A) for about two seconds.
Release the button when [SET] stops flashing. - Press (C) four times until the current setting (112H] or [24Hl) is flashing on the display.
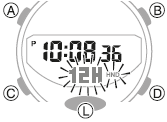
- Press (D) to toggle the setting between [12H] (12-hourtimekeeping) and [24H] (24-hour timekeeping).
- Press (A) to exit the setting screen.
Note
• While 12-hour timekeeping is selected, [Pl will be displayed for p.m. times.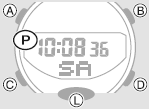
Illumination Light
The watch has an LED light that you can turn on for reading in the dark.
Illuminating the Face Manually
Pressing (L) turns on illumination.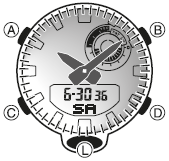
• Illumination will turn off automatically if an alarm starts to sound.
Auto Light
If Auto Light is enabled, the face illumination will turn on automatically whenever the watch is positioned at an angle of 40 degrees or more.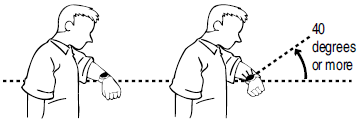
Important!
• Auto Light may not operate properly when the watch is at a horizontal angle of 15 degrees or greater from horizontal as shown in the illustration below.

• Electro-static charge or magnetism can interfere with proper auto light operation. If this happens, try lowering your arm and then angle it towards your face again.
• When moving the watch you may note a slight rattling sound. This is due to operation of the auto light switch, which determines the current orientation of the watch. It does not indicate malfunction.
Note
• Auto Light is disabled when any one of the conditions below exists.
- Alarm, timer alert, or other beeper sounding
- Hand movement operation is in progress
Configuring the Auto Light Setting
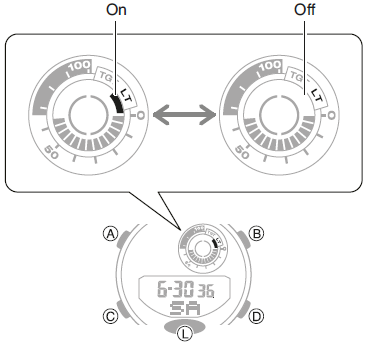
Each time (L) is held down for about three seconds in the Timekeeping Mode, Auto Light will toggle between enabled and disabled.
• If you do not disable it manually, Auto Light remains enabled for approximately six hours. After that, it becomes disabled automatically.
Specifying the Illumination Duration
You can select either 1.5 seconds or three seconds as the illumination duration.
- Enter the Timekeeping Mode. Navigating Between Modes
- Hold down (A) for about two seconds.
Release the button when [SET] stops flashing.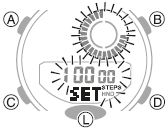
- Press (C) nine times to display [LT].
- Press (D) to toggle between the two illumination duration settings.
[1]: 1.5-second illumination
[3]: 3-second illumination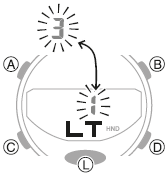
- Press (A) to exit the setting screen.
Hand Alignment Adjustment
Strong magnetism or impact can cause the time indicated by the analog hands to become different from the time on the digital display. If this happens, adjust hand alignment.
Getting Ready
Enter the Timekeeping Mode. Navigating Between Modes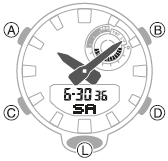
Adjusting Hand Alignment
- Enter the Timekeeping Mode. Navigating Between Modes
- Hold down the (A) button for about five seconds until [12:00] flashes on the display.
This enables adjustment of the hour and minute hands.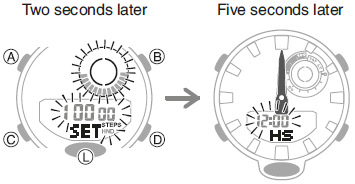
- If the hour hand and minute hand are not at 12 o'clock, use the (D) and (B) buttons to align them.
- Press (A) to exit the setting screen.
Battery Replacement
When battery power goes low,  will start to flash and some functions will become disabled.
If continues to flash, have the battery replaced.
Request battery replacement from a CASIO service center or your original retailer.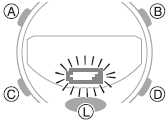
Other Settings
Getting Ready
Enter the Timekeeping Mode. Navigating Between Modes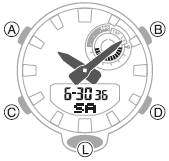
Enabling the Button Operation Tone
Use the procedure below to enable or disable the tone that sounds when you press a button.
- Enter the Timekeeping Mode. Navigating Between Modes
- Hold down (A) for about two seconds.
Release the button when [SET] stops flashing.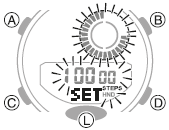
- Press (C) eight times to display (♪).
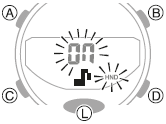
- Press (D) to toggle the button operation tone between enabled and disabled.
[On]: Operation tone enabled.
[OFF]: Operation tone disabled.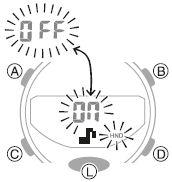
- Press (A) to exit the setting screen.
Moving to Another Time Zone
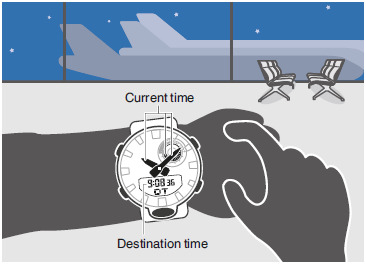
Use the procedure below to easily change day and time settings of the watch to a destination location.
• Before Boarding
- Configure the World Time (Dual Time) setting to the current time at your destination.
 Using G-SHOCK Connected to Configure Settings
Using Watch Operations to Configure Settings - Disable auto time adjustment.
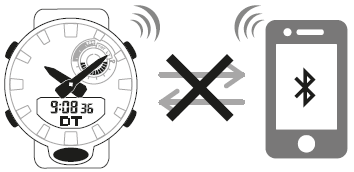 Using the Watch in a Medical Facility or Aircraft
• In the aircraft, before arriving at your destination
- Swap the origin time zone time with the destination time zone time.
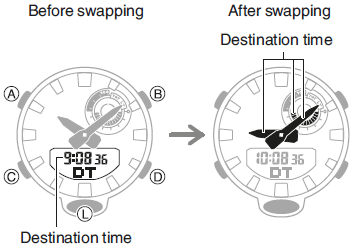 Using G-SHOCK Connected to Configure Settings Using Watch Operations to Configure Settings
• After Arriving
- Adjust the time setting. Triggering Immediate Time Adjustment
- Enable auto time adjustment. Using the Watch in a Medical Facility or Aircraft
Other Information
This section provides non-operational information you also need to know. Refer to this information as required.
Supported Phones
For information about phones that can connect with the watch, visit the CASIO website.
https://world.casio.com/os_mobile/wat/
Specifications
Accuracy at normal temperature :
± 15 seconds per month average when time adjustment by communication with a phone is not possible.
Timekeeping :
- Analog - Hour, minute (moves every 20 seconds)
- Digital - Hour, minute, second, month, day, day of the week, a.m./p.m. (P)/24-hour time format, full auto calendar (2000 to 2099)
- Summer Time
Pedometer:
- Step count measurement using a 3-axis accelerometer
- Step count display range: Oto 999,999 steps
- Step indicator
- Step count graph
- Step count reset
Auto zero-reset at midnight each day Manual reset - Daily step goal setting
Step count setting unit: 1,000 steps
Step count setting range: 1,000 to 50,000 steps - Step count accuracy
±3% (According to vibration testing) - Power Saving
Stopwatch/Data Recall :
- Measuring unit
1/100 seconds (first hour); 1 second (after first hour) - Measuring range: 23 hours 59 minutes 59 seconds
- Measurement Functions:
Normal elapsed time; cumulative time;
lap/split times; 200-record data memory - Target time alarm:
Up to 10 time settings; watch beeps (for 10 seconds) when a target time is reached
Timer:
- Measuring unit: 1 second
- Measuring range: 60 minutes
- Number of intervals: 1 to 5
- Number of auto repeats: 1 to 20
- Time setting unit: 1 second
- Time setting range: 1 second to 60 minutes
- Final 5-second countdown, time-up beeper
- Auto Start
Dual Time :
- Hour, minute, second
- Home Time swapping
Alarm:
- Time alarms
- Number of alarms: 5
- Setting units: Hours, minutes
- Alarm tone duration: 1 0 seconds
- Hourly time signal: Beep every hour on the hour
Mobile Link :
- Auto Time Correction
Time setting adjusted automatically at preset time. - One-touch Time Correction
Manual connection and time adjustment - Phone finder
Watch operation sounds the alert sound of the phone. - World Time
Current time for approximately 300 cities selected for the watch
Home Time/World Time swapping - Step count data transfer
Step count, calories - Stopwatch data transfer
200 lap/split time records ( date and time, lap/split time, lap number) - Auto Summer Time Switching
Automatic switching between standard time and summer time. - Timer Settings
- Alarm Settings
- Hand alignment correction
- Data Communication Specifications
Bluetooth®
Frequency Band: 2400MHz to 2480MHz
Maximum Transmission: 0 dBm (1 mW) Communication range: Up to 2 meters (depends on environment)
Other:
- High-brightness LED light; illumination
- duration setting; Auto Light; operation tone
- on/off; Hand Shift; low battery alert
Power Supply :
- CR2016x 1
- Battery life: Approximately 2 years
- Conditions
Auto time correction: 4 times/day
Alarm: Once (1 0 seconds)/day
Illumination: Once (1 .5 seconds)/day
Step counting: 12 hours/day
Specifications are subject to change without notice.
Mobile Link Precautions
• Legal Precautions
- This watch complies with or has received approval under the radio laws of various countries and geographical areas. Using this watch in an area where it does not comply with or has not received approval under applicable radio laws may be a criminal offense. For details, visit the CASIO Website.
https://world.casio.com/ce/BLE/ - Use of this watch inside of aircraft is restricted under the aviation laws of each country. Be sure to follow the instructions of airline personnel.
• Precautions when using Mobile Link
- When using this watch in combination with a phone, keep the watch and phone close to each other. A range of two meters is recommended as a guideline, but the local environment (walls, furniture, etc.), the structure of a building, and other factors may require a much closer range.
- This watch can be affected by other devices (electrical devices, audio-visual equipment, office equipment, etc.) In particular, it can be affected by operation of a microwave oven. The watch may not be able to communicate normally with a phone if a microwave oven is operating nearby. Conversely, this watch may cause noise in radio reception and the video image of a TV.
- Bluetooth of this watch uses the same frequency band (2.4 GHz) as wireless LAN devices, and use of such devices in close proximity of this watch may result in radio interference, slower communication speeds and noise for the watch and the wireless LAN device, or even communication failure.
• Stopping Radio Wave Emission by This Watch
The watch is emitting radio waves whenever is displayed.
Even if is not displayed, the watch will automatically attempt to connect with a phone four times a day to adjust its time settings.
When in a hospital, on an aircraft, or in any other area where the use of radio waves is not allowed, use the operations below to stop radio wave generation.
- Stopping Radio Wave Generation
Press any button besides (L) to terminate the Bluetooth connection.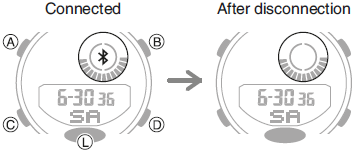
- Disabling Auto Time Adjustment
Configure G-SHOCK Connected settings to disable synchronization between the watch and phone. Using the Watch in a Medical Facility or Aircraft
Copyrights and Registered Copyrights
- The Bluetooth® word mark and logos are registered trademarks owned by the Bluetooth SIG, Inc. and any use of such marks by CASIO Computer Co., Ltd. is under license.
- iPhone and App Store are registered trademarks of Apple Inc. in the United States and other countries.
- iOS is a trademark or registered trademark of Cisco Systems, Inc.
- GALAXY, GALAXY Note, and GALAXY S are registered trademarks of Samsung Electronics Co., Ltd.
- Android and Google Playâ„¢ are trademarks or registered trademarks of Google LLC.
- Other company names and product names used herein are trademarks or registered trademarks of their respective companies.
Troubleshooting
I can't pair the watch with a phone.
Q1 I've never been able to establish a (pairing) connection between the watch and phone.
- Are you using a supported phone model?
Check if the phone model and its operating system are supported by the watch.
For information about supported phone models, visit the CASIO Website.
https://wor1d.casio.com/os_mobile/wat/ - Did you install G-SHOCK Connected on your phone?
G-SHOCK Connected needs to be installed on your phone in order to connect with the watch. G) Install the app on your phone. - Are your phone's Bluetooth settings configured correctly?
Configure the phone's Bluetooth settings. For details about setting procedures, see your phone documentation.
iPhone Users
• "Settings" ➔ "Bluetooth" ➔ On
Android Users
• Enable Bluetooth. - Other than the above.
Some phones need to have BT Smart disabled to use G-SHOCK Connected.
For details about setting procedures, see your phone documentation.
On the Home Screen, tap: "Menu" âž” "Settings" âž” "Bluetooth" âž” "Menu" âž” "BT Smart settings" âž” "Disable".
I can't reconnect the watch and phone.
Q1 The watch will not re-connect with the phone after they are disconnected.
- Is G-SHOCK Connected running?
The watch cannot re-connect with the phone unless G-SHOCK Connected is running on the phone. On the phone Home Screen, tap the "G-SHOCK Connected" icon. Next, on the watch, hold down MODE (C) for about two seconds to enter the Timekeeping Mode. After that, hold down CONNECT (D) for about two seconds to establish a connection between the watch and phone.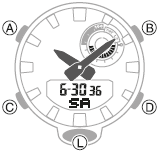
- Have you tried turning your phone off and then back on again?
Turn the phone off and then back on again. On the Home Screen, tap the "GSHOCK Connected" icon. Next, on the watch, hold down MODE (C) for about two seconds to enter the Timekeeping Mode. After that, hold down CONNECT (D) for about two seconds to establish a connection between the watch and phone. - Is a timer countdown operation in progress?
Connection with a phone is not possible while there is 30 seconds or less remaining on a countdown timer operation. Stop the countdown operation before connecting with the phone.
Q2 I can't connect while my phone is in the Airplane Mode.
After exiting the phone's Airplane Mode, go to its Home Screen and tap the "G-SHOCK Connected" icon. Next, on the watch, hold down MODE (C) for about two seconds to enter the Timekeeping Mode. After that, hold down CONNECT (D) for about two seconds to establish a connection between the watch and phone.
Q3 I changed the phone's Bluetooth from enabled to disabled, and now I can't connect anymore.
On the phone, change the Bluetooth setting from disabled to enabled, and then go to the Home Screen and tap the "G-SHOCK Connected" icon.
Next, on the watch, hold down MODE (C) for about two seconds to enter the Timekeeping Mode. After that, hold down CONNECT (D) for about two seconds to establish a connection between the watch and phone.
Q4 I can't connect after turning off the phone.
Tum on the phone. On the Home Screen, tap the "G-SHOCK Connected" icon.
Next, on the watch, hold down MODE (C) for about two seconds to enter the Timekeeping Mode. After that, hold down CONNECT (D) for about two seconds to establish a connection between the watch and phone.
Phone-Watch Connection
Q1 I can't establish a connection between the phone and watch.
- Have you tried turning your phone off and then back on again?
Turn the phone off and then back on again. On the Home Screen, tap the "GSHOCK Connected" icon.
Next, on the watch, hold down MODE (C) for about two seconds to enter the Timekeeping Mode. After that, hold down CONNECT (D) for about two seconds to establish a connection between the watch and phone. - Has the watch been re-paired with the phone?
After deleting pairing information from GSHOCK Connected, re-pair them. unpairing - If you are unable to establish a connection ...
Use the procedure below to delete the pairing information from the watch, and then re-pair the watch and phone.
(1) Hold down (C) for about two seconds to enter the Timekeeping Mode.
(2) Hold down (A) until [SET] stops flashing on the display.
(3) Press (C).
(4) Hold down (B) until [CLR] stops flashing on the display.
(5) Press (A) to exit the setting screen.
Changing to a Different Phone Model
Q1 Connecting the current watch to another phone.
Pair the watch with the phone. If you purchase another phone
Auto Time Adjustment by Bluetooth Connection (Time Adjustment)
Q1 When does the watch adjust is time?
The watch will connect with the phone and perform auto time adjustment at around 12:30 a.m., 6:30 a.m., 12:30 p.m. and 6:30 p.m. The connection is automatically terminated after auto time adjustment is complete.
Q2 Auto time adjustment does not start.
- Did you recently swap your Home Time and World Time, or manually adjust the watch's time setting?
Note that auto time adjustment is not performed for 24 hours after swapping of the Home Time and World Time, or after the time setting is adjusted manually on the watch. Auto time adjustment will resume 24 hours after either of the above operations is performed. - Is auto time adjustment enabled?
Auto time adjustment will not be performed at the scheduled times unless it is enabled. Enable auto time adjustment. Using the Watch in a Medical Facility or Aircraft
Q3 Time is not displayed correctly.
The phone's time setting may be incorrect because it is unable to connect with its network due to being out of range, etc. If this happens, connect the phone to its network and then adjust the time setting.
Pedometer
Q1 Displayed step count is not correct.
While the watch is on your wrist, the pedometer may detect non-step movements and count them as steps. Pedometer
Also, step count problems can also be caused by how the watch is being worn and abnonnal ann movement while walking. Counting Steps
Q2 The step count does not increase.
The step count is not displayed at the beginning of a walk in order to avoid miscounting of non-walking movements.
It appears only after you have continued walking for about 10 seconds, with the number of steps you took during the first 10 seconds included in to the total.
Q3 [ERR] appears when using the pedometer.
[ERR] ( error) indicates that sensor operation is disabled because of sensor or internal circuitry malfunction.
If the indicator remains on the display for more than three minutes or if it frequently appears, it could indicate a faulty sensor.
Alarm
Q1 The alann does not sound.
Is the alarm setting turned on? If it isn't, turn it on so it will sound. Enabling/Disabling an Alann or the Hourly Time Signal
Hand Movement and Indications
Q1 I don't know what mode the watch is in.
You can detennine the current mode by checking the watch display. Use (C) to navigate between modes. Navigating Between Modes
Q2 All hands are stopped and buttons do not work.
The battery is dead. Request battery replacement by your original retailer or authorized CASIO service center. Battery Replacement
Q3 The hands suddenly start moving at high speed.
This is due to one of the reasons below, and does not indicate malfunction. Simply wait until normal hand movement resumes.
• Watch is connected with a phone to adjust its time setting. Auto Time Adjustment
Q4 The current time indicated by the watch is off by one hour or 30 minutes.
The summer time setting is not correct. Select the correct setting. Changing the Home City Summer Time Setting
Q5 The time indicated by the hands is different from the digital time.
Strong magnetism or impact can cause the hands to go out of alignment. Adjust hand alignment. Adjusting Hand Alignment
• Check the information below to find out how to align the hands manually. Hand Alignment Adjustment
Battery
Q1 is flashing on the digital display.
This indicates that battery power is getting low. Request battery replacement by your original retailer or authorized CASIO service center. Battery Replacement
Q2 [R] is flashing on the digital display.
This happens when battery power is low or after the light or some other function is turned on repeatedly over a short amount of time, which temporarily runs down the battery. All functions other than timekeeping are disabled while [R] is flashing on the display.
If [R] remains on the display or if it keeps appearing, it may indicate that the battery needs to be replaced.
Request battery replacement by your original retailer or authorized CASIO service center.