
USER MANUAL FOR DP C18.CAN
CONTENT
IMPORTANT NOTICE
- If the error information from the display cannot be corrected according to the instructions, please contact your retailer.
- Please use this product with care.
- Do not use thinners or other solvents to clean the display. Such substances can damage the surfaces.
- The product is designed to be waterproof. It is highly recommended to avoid submerging the display under water.
- Warranty is not included due to wear and normal use and aging.
- Do not clean the display with a steam jet, high-pressure cleaner or water hose.
INTRODUCTION OF DISPLAY
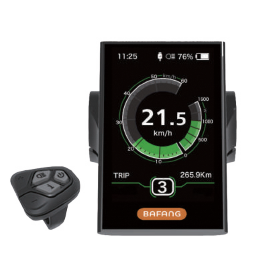
- Model: DP C18.CAN BUS
- The housing material is PC; the Display Glass is made of high-currentem material:
- The label marking is as follows:
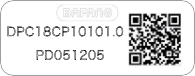
Note: Please keep the QR code label attached to the display cable. The information from the Label is used for a later possible software update.
PRODUCT DESCRIPTION
Specifications
- Operating temperature: -20℃~45℃
- Storage temperature: -20℃~50℃
- Waterproof: IP65
- Bearing humidity: 30%-70% RH
Functional Overview
- Speed display (including top speed and average speed, switching between km and miles).
- Battery capacity indicator.
- Automatic sensors explanation of the lighting system.
- Brightness setting for backlight.
- Indication of performance support.
- Motor output power and output current indicator.
- Kilometer stand (including single-trip distance, total distance and remaining distance).
- Walk assistance.
- Setting the support levels.
- Energy consumption indicator CALORIES (Note: If the display has this function).
- Display for the remaining distance. (Depends on your riding style)
- Setting password.
DISPLAY
- Time
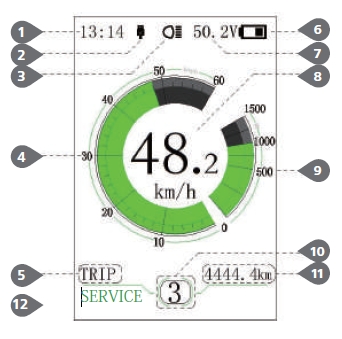
- USB charging indicator displays the icon
 , if an external USB device is connected to the display.
 - The display shows
 this symbol, if the light is on.
 - Speed Graphics
- Trip:
- Daily kilometers (TRIP)
- Total kilometers (ODO)
- Top speed (MAX)
- Average speed (AVG)
- Range (RANGE)
- Energy Consumption (CALORIES(only with torque sensor fitted))
- Travel time (TIME). - Display of battery capacity in real time.
- Voltage indicator in voltage or in percent.
- Digital speed display.
- Power indicator in watts / amperes.
- Support level/ Walking assistance

- Data: Display data, which corresponds to the current mode.
- Service: Please see the service section
KEY DEFINITION
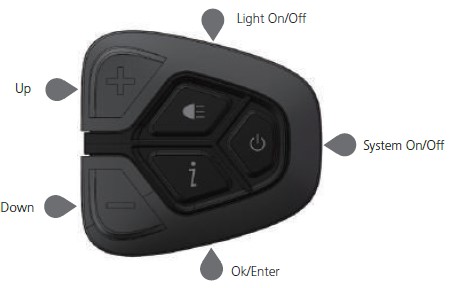
NORMAL OPERATION
Switching the System ON/OFF
Press and hold  (>2 S) on the display to turn on the system. Press and hold (>2 S) again to turn off the system.
If the "automatic shutdown time" is set to 5 minutes (it can be set with the "Auto Off" function, See "Auto Off"), the display will automatically be turned off within the desired time when it is not in operation.
If the password function is enabled, you must enter the correct password to use the system.
Selection of Support Levels
When the display is turned on, press the  or
or  (<0.5 S) button to switch to the support level, the lowest level is 0, the highest level is 5. When the system is switched on, the support level starts in level 1. There is no support at level 0.
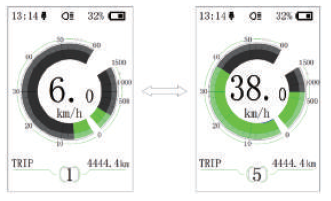
Selection Mode
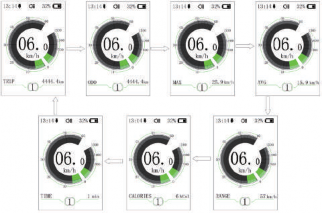
Briefly press the  (0.5s) button to see the different trip modes.
Trip:
- daily kilometers (TRIP)
- total kilometers (ODO)
- Maximum speed (MAX)
- Average speed (AVG)
- Range (RANGE)
- Energy consumption (CALORIES (only with torque sensor fitted))
- Travel time (TIME).
Headlights / backlighting
Hold the (>2S) button to activate the headlight and taillights.
Hold the (>2S) button again to turn off the headlight. The brightness of the backlight can be set in the display settings "Brightness". If the display /Pedelec is switched on in a dark environment, the display backlight/headlight will automatically be switched on. If the display backlight/headlight
has been manually switched off, the automatic sensor function is deactivated. You can only turn on the light manually. After switching on the system again.
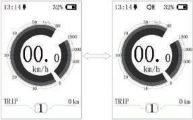
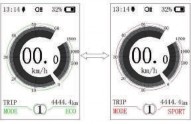
ECO/SPORT Modus
Press and hold the (<2 S) Button, to change from ECO mode to Sport mode. (Depending on the version of the pedelec manufacturer)
Walk Assistance
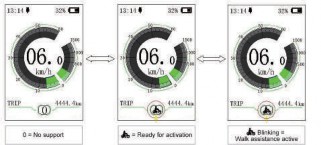
The Walk assistance can only be activated with a standing pedelec.
Activation:
- Press the button until this symbol appears.
- Next hold down the button whilst the symbol is displayed.
- Now the Walk assistance will activate.
- The symbol will flashes and the pedelec moves approx. 6 km/h.
- After releasing the button, the motor stops automatically and switches back to level 0.
SERVICE
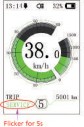
The display shows "Service" as soon as a certain number of kilometers or battery charges has been reached. With a mileage of more than 5000 km (or 100 charge cycles), the “Service" function is displayed on the display. Every 5000 km the display "SERVICE" is displayed every time. This function can be set in the display settings.
SETTINGS
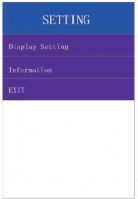
After the display is turned on, quickly press the button twice, to access the “SETTINGS†menu.
By pressing the or (<0.5S) button, you can select: Display Settings, Information or EXIT.
Then press the (<0.5S) button to confirm your selected option.
Or select "EXIT" and press the (<0.5S) button to return to the main menu, or select "BACK" and press the (<0.5S) button to return to the Settings interface.
If no button is pressed within 20 seconds, the display will automatically return to the main screen and no data will be saved.
You can quickly press the (<0.5S) button twice at any time, to return to the main screen.
“Display settingâ€
Press the or (<0.5S) button to select Display Settings, and then briefly press the (<0.5S) button to access the following selections.
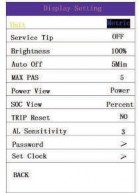
“Unit†Selections in km/Miles
Press the or (<0.5S) button to highlight “Unit†in the Display settings menu, and then press the (<0.5S) button to select. Then with the or button choose between “Metric†(kilometer) or “Imperial†(Miles). Once you have chosen your desired selection, press the (<0.5S) button to save and exit to the "Display setting" interface.
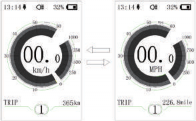
“Service Tip†Switching the notification on and off
Press the or (<0.5S) button to highlight “Service tip†in the Display settings menu, and then press (<0.5S) to select.
Then with the or button choose between “ON†or “OFFâ€. Once you have chosen your desired selection, press the (<0.5S) button to save and exit to the "Display setting" interface.
“Brightness†Display brightness
Press the or (<0.5S) button to high light “Brightness†in the Display settings menu. Then press (<0.5S) to select. Then with the or button choose between "100%" / "75%" / "50%" /" 30%"/"10%" .
Once you have chosen your desired selection, press the (<0.5S) button to save and exit to the "Display setting" interface.
“Auto Off†Set Automatic system switch off time
Press the or (<0.5S) button to highlight “Auto Off†in the Display settings menu, and then press (<0.5S) to select.
Then with the or button choose between “OFFâ€, "9"/"8"/"7"/"6"/"5"/"4"/"3"/"2"/"1", (The numbers are measured in minutes). Once you have chosen your desired selection, press the (<0.5S) button to save and exit to the "Display setting" interface.
“MAX PAS†Support level (Function not available with ECO/SPORT display)
Press the or (<0.5S) button to highlight “Max Pass†in the Display settings menu, and then press (<0.5S) to select.
Then with the or button choose between “3/5/9†(the amount of support levels). Once you have chosen your desired selection, press the (<0.5S) button to save and exit to the "Display setting"
“Default Mode†Set for ECO/Sport mode
Press the or (<0.5S) button to highlight “Default Mode†in the Display settings menu. Then press (<0.5S) to select. Then with the or button choose between “ECO†or “Sportâ€. Once you have chosen your desired selection, press the (<0.5S) button to save and exit to the "Display setting" interface.
“Power View†Setting the power indicator
Press the or (<0.5S) button to highlight “Power View†in the Display settings menu, and then press (<0.5S) to select.
Then with the or button choose between “Power†or “Currentâ€. Once you have chosen your desired selection, press the (<0.5S) button to save and exit to the "Display setting" interface.
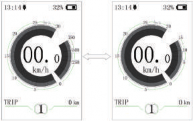
“SOC View†Battery view in volt percent
Press the or (<0.5S) button to highlight “SOC View†in the Display settings menu, and then press (<0.5S) to select.
Then with the or button choose between “percent†or “voltage “. Once you have chosen your desired selection, press the (<0.5S) button to save and exit to the "Display setting"
“TRIP Reset†Reset mileage
Press the or (<0.5S) button to highlight “TRIP Reset†in the Display settings menu, and then press (<0.5S) to select.
Then with the or button choose between “YES†or “NOâ€. Once you have chosen your desired selection, press the (<0.5S) button to save and exit to the "Display setting"
"AL Sensitivity†Automatic headlight sensitivity
Press the or (<0.5S) button to highlight “AL-Sensetivity†in the Display settings menu, and then press (<0.5S) to select.
Then with the or button choose between "0" / " 1" / " 2"/ "3" / "4"/ "5"/ "OFFâ€.
Once you have chosen your desired selection , press the (<0.5S) button to save and exit to the "Display setting"
“Passwordâ€
Press the or (<0.5S) button to choose Password in the menu. Then by briefly pressing (<0.5S) to enter the password selection. Now again with the or (<0.5S) buttons highlight “Start Password" and press the (<0.5S) button to confirm.
Now again using the or (<0.5S) Button choose between “ON†or “OFF†and press the (<0.5S) button to confirm.
Now you can input your 4-digit pin code. By using the or (<0.5S) button choose numbers between "0-9". By briefly pressing the (<0.5S) button you can move on to the next number.
After entering your desired 4-digit code, you must re-enter the 4-digits you chose, to ensure the code is correct.
After selecting a password, the next time you turn on the system it will ask you to input your password. Press the or (<0.5S) button to select the numbers, Then press briefly (<0.5S) to confirm.
After entering the wrong number three times, the system switches off. If you have forgotten the password, please contact your retailer.
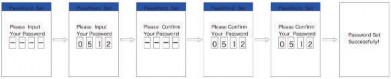
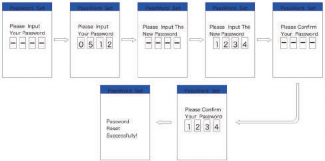
Changing the password:
Press the or (<0.5S) button to choose Password in the menu. Then by briefly pressing (<0.5S) to enter the password section. Now again with the or (<0.5S) button highlight “Password set" and press the (<0.5S) button to confirm. Now with the or (<0.5S) buttons and highlight “Reset Password†and with the (<0.5S) button to confirm.
By entering your old password once, followed by inputting the new password twice, then your password will be changed.
Deactivating the password:
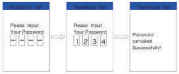
To deactivate the password, use the or buttons to get to the menu point “Password†and press the (<0.5S) button to highlight your selection. Press the or (<0.5S) button until is shows “OFFâ€. Then press briefly (<0.5S) to select.
Now enter your password, to deactivate it.
“Set Clockâ€
Press the or (<0.5S) Button to access the “Set Clock†menu. Then briefly press the (<0.5S) button to confirm selection. Now press the or (<0.5S) button and input the correct number (time) and press the (<0.5S) button to move to the next number.
After entering the correct time, press the (<0.5S) button to confirm and save.
“Informationâ€
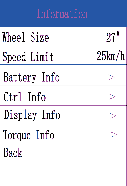
Once the system is turned on, quickly Press the (<0.5S) button twice to access the "SETTINGS" menu. Press or (<0.5S) button to select "Information", and then press the (<0.5S) button to confirm your selection.
Or select the point "EXIT" by confirming with the (<0.5S) button to return to the main menu.
Wheel Size and Speed Limit
The "Wheel Size†and "Speed Limit†cannot be changed, this information is here to be viewed only.
Battery Information
Press the or (<0.5S) button to access the Battery Info menu, and then press the (<0.5S) button to select confirm. Now press the or (<0.5S) button and select "Back†or “Next Page". Then press the (<0.5S) button to confirm, now you can read the battery information.
| Content | Explanation |
| TEMP | Current temperature in degrees (°C) |
| TotalVolt | Voltage (V) |
| Current | Discharge (A) |
| Res Cap | Remaining Capacity (A/h) |
| Full Cap | Total Capacity (A/h) |
| RelChargeState | Default Loader Status (%) |
| AbsChargeState | Instant charge (%) |
| Cycle Times | Charging cycles (number) |
| Max Uncharge Time | Maximum time in which no charge was made (Hr) |
| Last Uncharge Time | |
| Total Cell | Number (individual) |
| Cell Voltage 1 | Cell Voltage 1 (m/V) |
| Cell Voltage 2 | Cell Voltage 2 (m/V) |
| Cell Voltage n | Cell Voltage n (m/V) |
| HW | Hardware Version |
| SW | Software Version |
NOTE: If no data is detected, "--" is displayed.
Controller Information
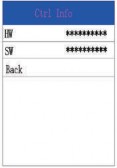
Press the or (<0.5S) button and select "CTRL Info", and then press the (<0.5S) button to confirm. Now you can read the controller information. To Exit press the (<0.5S) button, once “EXIT†is highlighted to return to the information settings.
Display Information
Press the or (<0.5S) button and select Display Info, then press the (<0.5S) button to read the software and hardware data in the display. To Exit press the (<0.5S) button, once “EXIT†is highlighted to return to the information settings.
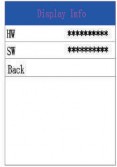
Torque Information
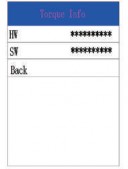
Press the or (<0.5S) button and select “Torque infoâ€, then press the (<0.5S) button to read the software and hardware data in the display. To Exit press the (<0.5S) button, once “EXIT†is highlighted to return to the information settings.
Error Code
Press the or (<0.5S) button and select “Error Codeâ€, and then press the (<0.5S) button to confirm. It shows error information for the last ten errors of the pedelec. Error code "00"means that there is no error. To return to the menu press the (<0.5S) button, once "BACK" is highlighted to return to the information settings.
ERROR CODE DEFINITION
 The display can show the errors of a pedelec. If an error is detected, the wrench icon
  appears on the display and one of the following error codes will be displayed.
Note: Please read the description of the error code carefully. If you see the error code, restart the system first. If the problem is not resolved, please contact your dealer.
| Error | Declaration | Troubleshooting |
| 04 | The throttle is not back in its correct position. | Check the throttle can adjust back into its correct position, if the situation does not improve, please change to a new throttle. (only with this function) |
| 05 | The throttle has fault. |
|
| 07 | Overvoltage protection |
|
| 08 | Error with the hall sensor signal inside the motor | Please contact your retailer. |
| 09 | Error with the Engine phase’s | Please contact your retailer. |
| 10 | The temperature inside the engine has reached its maximum protection value |
|
| 11 | The temperature sensor inside the motor has an error | Please contact your retailer. |
| 12 | Error with the current sensor in the controller | Please contact your retailer. |
| 13 | Error with the temperature sensor inside of the battery | Please contact your retailer. |
| 14 | The protection temperature inside the controller has reached its maximum protection value |
|
| 15 | Error with the temperature sensor inside the controller | Please contact your retailer. |
| 21 | Speed sensor Error |
|
| 25 | Torque signal Error |
|
| 26 | Speed signal of the torque sensor has an error |
|
| 27 | Overcurrent from controller | Please contact your retailer. |
| 30 | Communication problem |
|
| 33 | Brake signal has an error (If brake sensors are fitted) |
|
| 35 | Detection circuit for 15V has an error | Please contact your retailer. |
| 36 | Detection circuit on the keypad has an error | Please contact your retailer. |
| 37 | WDT circuit is faulty | Please contact your retailer. |
| 41 | Total voltage from the battery is too high | Please contact your retailer. |
| 42 | Total voltage from the battery is too low | Please contact your retailer. |
| 43 | Total power from the battery cells is too high | Please contact your retailer. |
| 44 | Voltage of the single cell is too high | Please contact your retailer. |
| 45 | Temperature from the battery is too high | Please contact your retailer. |
| 46 | The temperature of the battery is too low | Please contact your retailer. |
| 47 | SOC of the battery is too high | Please contact your retailer. |
| 48 | SOC of the battery is too low | Please contact your retailer. |
| 61 | Switching detection defect | Please contact your retailer. (only with this function) |
| 62 | Electronic derailleur cannot release. | Please contact your retailer. (only with this function) |
| 71 | Electronic lock is jammed | Please contact your retailer. (only with this function) |
| 81 | Bluetooth module has an error | Please contact your retailer. (only with this function) |
BF-UM-C-DP C18-EN November 2019